Верстаем дизайн для блога. Часть 1
Сегодня мы займемся версткой. Это первая статья из серии. В ней мы сделаем разметку нашей будущей страницы.
В чем верстать выбор лично ваш, я предпочитаю NetBeans.
Для начала создадим 2 файла «index.html» и «style.css», а также папку «images» в ней мы будем хранить картинки для шаблона.
В файл «index.html» добавим следующий код:
А в файл «style.css»:
Получим, пустую страницу с заголовком «Дизайн блога».
Первое что мы сделаем это фон нашей будущей страницы. Для этого из нашего шаблона вырежем кусочек фона 3х3 пикселя:

Сохраним его в папке «images» под именем «bg.gif» и добавляем в файле «style.css» в теге «body» следующий код «background-image: url(‘images/bg.gif‘);» получаем:
На данный момент мы имеем страницу, залитую нашим паттерном для фона.
Теперь перейдем к разметки страницы, мы должны получить шаблон с одним сайд баром справа и прижатым к низу футером.
В файле index.html добавим следующий код:
Дивы для шапки, контента и футера и небольшой трюк «<div style=»clear:both; height:1px; width:5px; float:right;»></div>», что бы футер располагался там где нужно.
Теперь добавим стили, в «style.css» пишем следующие:
Получаем следующие:
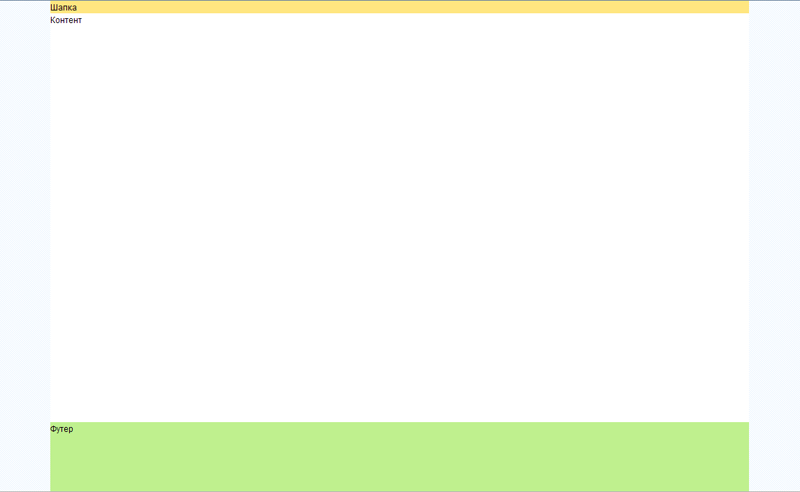
Теперь добавим сайдбар примерно в 1\3 ширины шаблона. Для этого в файле «index.html» в теге «content» добавляем:
И в стилях:
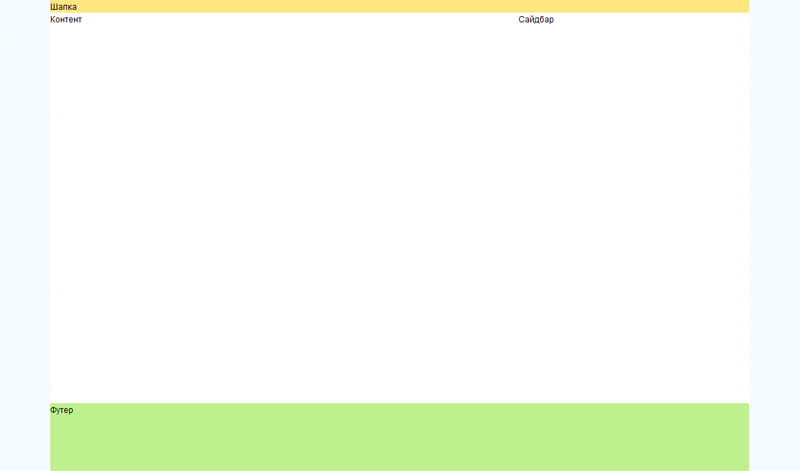
И напоследок добавим тень, отбрасываемую нашей страницей на фон. Для этого вырезаем из нашего шаблона небольшие кусочки тени:


И сохраняем их в папке «images» под именами «shadow_l. gif» и «shadow_r.gif» соответственно. Далее добавляем в файл «index.html» после «<div id=”wrapper”>» следующие строки:
И конечно закрываем теги после:
Добавляем:
В итоге код «index.html» выглядит следующим образом:
Осталось добавить стили.
Файл стилей в итоге выглядит так:
А шаблон:

На этом все. В следующем уроке мы сверстаем шапку сайта.
Файлы
В чем верстать выбор лично ваш, я предпочитаю NetBeans.
Для начала создадим 2 файла «index.html» и «style.css», а также папку «images» в ней мы будем хранить картинки для шаблона.
В файл «index.html» добавим следующий код:
<!DOCTYPE html PUBLIC "-//W3C//DTD XHTML 1.0 Strict//EN" "http://www.w3.org/TR/xhtml1/DTD/xhtml1-strict.dtd">
<html xmlns="http://www.w3.org/1999/xhtml">
<head>
    <title>Дизайн блога</title>
    <meta http-equiv="content-type" content="text/html; charset=utf-8" />
    <meta name="title" content="" />
    <meta name="keywords" content="" />
    <meta name="description" content="" />
    <link rel="stylesheet" href="style.css" type="text/css" media="screen" />
</head>

<body>

</body>
</html>
А в файл «style.css»:
* {
    margin: 0;
    padding: 0;
}
html {height: 100%}
body {
    font: 12px/18px Arial, Tahoma, Verdana, sans-serif;
    width: 100%;
    height: 100%;
}
a {
    color: blue;
    outline: none;
    text-decoration: underline;
}
a:hover {
    text-decoration: none;
}
p {margin: 0 0 18px}
img {
    border: none;
}
input {vertical-align: middle}
Получим, пустую страницу с заголовком «Дизайн блога».
Первое что мы сделаем это фон нашей будущей страницы. Для этого из нашего шаблона вырежем кусочек фона 3х3 пикселя:
Сохраним его в папке «images» под именем «bg.gif» и добавляем в файле «style.css» в теге «body» следующий код «background-image: url(‘images/bg.gif‘);» получаем:
body {
    font: 12px/18px Arial, Tahoma, Verdana, sans-serif;
    width: 100%;
    height: 100%;

    background-image: url('images/bg.gif');
}
На данный момент мы имеем страницу, залитую нашим паттерном для фона.
Теперь перейдем к разметки страницы, мы должны получить шаблон с одним сайд баром справа и прижатым к низу футером.
В файле index.html добавим следующий код:
<div id = "wrapper">

<div id="heightFixer"></div>

<!--      Шапка         -->
<div id="header">
Шапка
</div>

<!--      Контент         -->
<div id="content">
Контент
</div>

<div style="clear:both; height:1px; width:5px; float:right;"></div>

<!--      Футер         -->
<div id="footer">
Футер
</div>

</div>
Дивы для шапки, контента и футера и небольшой трюк «<div style=»clear:both; height:1px; width:5px; float:right;»></div>», что бы футер располагался там где нужно.
Теперь добавим стили, в «style.css» пишем следующие:
#wrapper
{
    width: 1000px;
    margin: 0 auto;
    height: 100%;

    background: #fff;

    text-align: left;
}

#heightFixer
{
    float:right;
    height:100%;
    width:1px;
    margin-right:-5px;
    margin-bottom:-100px;
}

/*     Шапка        */

#header
{
  background: #FFE680;
}
/*     Контент       */
#content
{
    padding-bottom:100px;
}

/*     Футер        */
#footer
{
   clear:both;
   height:99px;

   background: #BFF08E;
}
Получаем следующие:
Теперь добавим сайдбар примерно в 1\3 ширины шаблона. Для этого в файле «index.html» в теге «content» добавляем:
<div id="main">Контент</div>
<div id="sidebar">Сайдбар</div>

<div style="clear:both; float:right;"></div>
И в стилях:
  #main
 {
       float: left;
 }
#sidebar
{
        float: right;
        width: 33%;
}

/* Только для IE */
* html #footer
{
    height:82px;
}
И напоследок добавим тень, отбрасываемую нашей страницей на фон. Для этого вырезаем из нашего шаблона небольшие кусочки тени:
И сохраняем их в папке «images» под именами «shadow_l. gif» и «shadow_r.gif» соответственно. Далее добавляем в файл «index.html» после «<div id=”wrapper”>» следующие строки:
<div id="shadow_r">
<div id="shadow_l">
<!— /* Style Definitions */ p.MsoNormal, li.MsoNormal, div.MsoNormal {mso-style-parent:»»; margin:0cm; margin-bottom:.0001pt; mso-pagination:widow-orphan; font-size:12.0pt; font-family:»Times New Roman»; mso-fareast-font-family:»Times New Roman»;} @page Section1 {size:612.0pt 792.0pt; margin:2.0cm 42.5pt 2.0cm 3.0cm; mso-header-margin:36.0pt; mso-footer-margin:36.0pt; mso-paper-source:0;} div.Section1 {page:Section1;} —>
И конечно закрываем теги после:
<div id="footer">
Футер
</div>
Добавляем:
</div>
</div>
В итоге код «index.html» выглядит следующим образом:
<!DOCTYPE html PUBLIC "-//W3C//DTD XHTML 1.0 Strict//EN" "http://www.w3.org/TR/xhtml1/DTD/xhtml1-strict.dtd">
<html xmlns="http://www.w3.org/1999/xhtml">
<head>
    <title>Дизайн блога</title>
    <meta http-equiv="content-type" content="text/html; charset=utf-8" />
    <meta name="title" content="" />
    <meta name="keywords" content="" />
    <meta name="description" content="" />
    <link rel="stylesheet" href="style.css" type="text/css" media="screen" />
</head>

<body>

<div id = "wrapper">

<div id="shadow_r">
<div id="shadow_l">

<div id="heightFixer"></div>

<!--      Шапка         -->
<div id="header">
Шапка
</div>

<!--      Контент         -->
<div id="content">

    <div id="main">Контент</div>
    <div id="sidebar">Сайдбар</div>

<div style="clear:both; float:right;"></div>

</div>

<div style="clear:both; height:1px; width:5px; float:right;"></div>

<!--      Футер         -->
<div id="footer">
Футер
</div>

</div>
</div>

</div>


</body>

</html>
Осталось добавить стили.
/* Тени */

#shadow_r
{
    padding-right: 16px;
    height:100%;
    background:url('images/shadow_r.gif') repeat-y right;
}
#shadow_l
{
    padding-left: 8px;
    height:100%;
    background:url('images/shadow_l.gif') repeat-y left;
}
Файл стилей в итоге выглядит так:
* {
    margin: 0;
    padding: 0;
}
html {height: 100%}
body {
    font: 12px/18px Arial, Tahoma, Verdana, sans-serif;
    width: 100%;
    height: 100%;

    text-align: center;

    background-image: url('images/bg.gif');
}
a {
    color: blue;
    outline: none;
    text-decoration: underline;
}
a:hover {
    text-decoration: none;
}
p {margin: 0 0 18px}
img {
    border: none;
}
input {vertical-align: middle}

#wrapper
{
    width: 1000px;
    margin: 0 auto;
    height: 100%;

    background: #fff;

    text-align: left;
}

#heightFixer
{
    float:right;
    height:100%;
    width:1px;
    margin-right:-5px;
    margin-bottom:-100px;
}

/*     Шапка        */

#header
{
  background: #FFE680;
}
/*     Контент       */
#content
{
    padding-bottom:100px;
}
    #main
    {
        float: left;
    }
    #sidebar
    {
        float: right;
        width: 33%;
    }

/*     Футер        */
#footer
{
   clear:both;
   height:99px;
   background: #BFF08E;
}
/* Только для IE */
* html #footer
{
    height:82px;
}

/* Тени */

#shadow_r
{
    padding-right: 16px;
    height:100%;
    background:url('images/shadow_r.gif') repeat-y right;
}
#shadow_l
{
    padding-left: 8px;
    height:100%;
    background:url('images/shadow_l.gif') repeat-y left;
}
А шаблон:
На этом все. В следующем уроке мы сверстаем шапку сайта.
Файлы
Теги:
Похожие новости:
Комментарии:
Нету комментариев для вывода...